It’s as simple as baking your favorite cookies and putting them in a box. Not too hard, right? Well, there’s a few additional steps that can make the process a little tricky. But no fear, we’ve got you covered!
Step 1: Choose Your Cookies
Whether you choose to buy pre-made cookies, make your own at home, or a mix of both, a key tip is to choose ones that will hold up well in transit. A few examples of easily breakable cookies that you may consider avoiding are Tuile, Pizzelle, and Wafers.
Another tip is to consider having a variety of shapes and sizes within the cookie box. And while it doesn’t have to be a whole bakery within a box, a great option is to have one specialty holiday cookie paired with 2-3 more traditional, easy cookies. A few of those classics would be chocolate chip cookies, blondies, jumbo marshmallows, almond biscotti, assorted tea cookies, thumbprints, etc.
A Few Specialty Cookie Ideas:
- Triple Chocolate Hazelnut Cookies (recipe below)
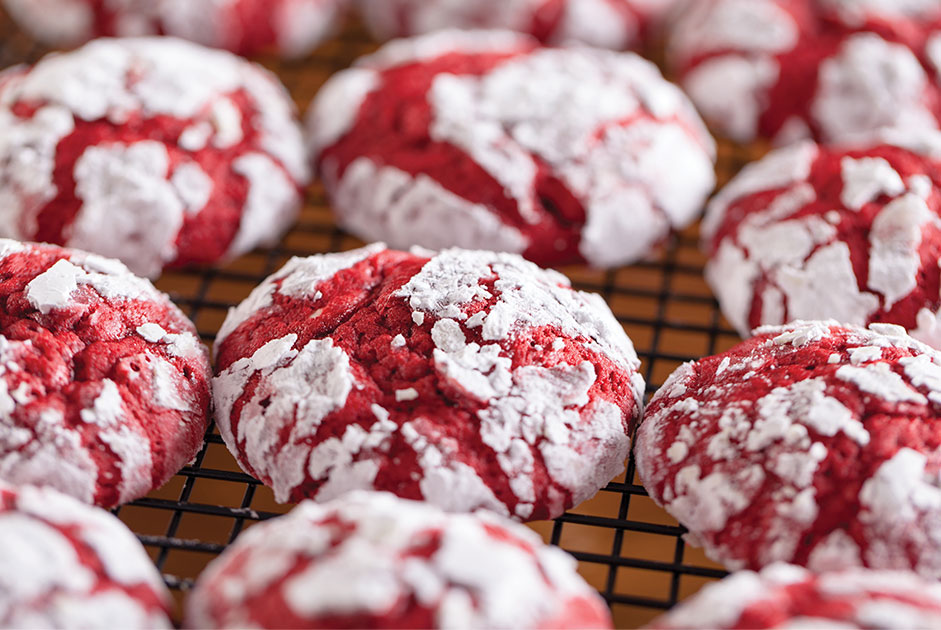
- Red Velvet Crinkle Cookies (recipe below)
- Snowflake Sugar Cookies
- Millionaires’ Shortbread
- Christmas Tree Cut-Out Linzer Cookies
- White Chocolate & Peppermint Blondies
- Santa Claus Cookies
- Gingerbread Men Cookies
- Seasonally flavored Whoopie Pies
- Fig Cookies
- Raspberry Almond Snowball Cookies
Step 2: Purchase a Sturdy Box
You’ll want to be clever in choosing a box that can hold up in transit, like a heavy-duty cardboard box that has dividers for the different types of cookies. Another option is to use a large cookie tin.
If shipping, a key tip is to wrap the cookie box or tin in saran wrap to keep the cookies safe and fresh, while also double wrapping in bubble wrap to keep them from bouncing around in the shipping box.
Step 3: Gather Festive Decorations
Besides taste testing and baking the cookies, this may be the next best part! The possibilities are endless with the abundance of festive ribbons, holiday cookie tins, stickers, small ornaments to sporadically place inside the box, food safe tissue paper, etc. And if shipping, consider placing the cookies in individual holiday ziploc storage bags before adding into the box.
Step 4: Package the Cookies
Be sure to package the heavier cookies on the bottom to keep them from crushing your more fragile cookies. Also, you may consider adding a layer of food safe shredded paper or tissue paper between each new layer or division. For the final layer, create that memorable box-opening experience by adding one last layer of shredded or tissue paper with a handwritten holiday card. Not only will it help keep the cookies snug, but also gives you the opportunity to make a personal connection!
Spread the holiday cheer in one of the simplest ways. Whether you take a day to bake all things peppermint and cocoa or choose to pick up three simple pre-made cookie doughs from the store, your recipient is bound to be filled with joy!
Red Velvet Crinkle Cookies (Yields: 24 Cookies)
Ingredients:
- 1/2 cup butter, softened
- 1/2 cup brown sugar
- 1/4 cup cane sugar
- 2 eggs, room temp.
- 2 tsp. vanilla extract
- 1/2 tsp. red food coloring
- 2 cups all purpose flour
- 1/3 cup cocoa powder
- 1 1/2 tsp. baking powder
- 1/2 tsp. salt
- 1/2 cup powdered sugar, for rolling
- 1/3 cup granulated cane sugar, for rolling
Instructions:
- Preheat oven to 350F. Line a baking pan with parchment paper.
- Cream the butter, brown sugar, and granulated cane sugar until light and fluffy. Beat in one egg at a time. Fold in the vanilla and red food coloring to mix until well combined.
- In a separate mixing bowl, sift the flour, cocoa powder, baking powder, and salt.
- Add the flour mix into the sugar bowl, then beat until well combined.
- Fill a large bowl with the remaining granulated cane sugar and powdered sugar.
- Scoop the cookies using a 1 oz cookie scoop, then roll in the powdered sugar bowl. Place on the prepared baking pan 1″ apart.
- Bake for 10-12 minutes, or until puffed up and cracked. Allow them to cool, then enjoy!
Triple Chocolate Hazelnut Cookies (Yields: 2 dozen)
Ingredients:
- 1 3/4 cups all purpose flour
- 1/2 cup granulated cane sugar
- 1/2 cup brown sugar
- 1 tsp. baking powder
- 1/4 tsp. baking soda
- 1/2 tsp. kosher salt
- 1/2 tsp. instant coffee powder
- 1/2 cup cocoa powder
- 1/3 cup + 1 tbsp. olive oil
- 1/3 cup chocolate hazelnut spread
- 1 large egg, room temp.
- 1 tsp. vanilla extract
- 1/2 cup toasted hazelnuts, crushed
- 3/4 cup bittersweet chocolate, coarsely chopped
Instructions:
- Preheat oven to 350F. Line two baking sheets with parchment paper.
- In a large bowl, whisk together the flour, granulated cane sugar, brown sugar, baking powder, baking soda, salt, and instant coffee until well combined.
- In the bowl of a stand mixer, beat the cocoa powder, olive oil, and chocolate hazelnut spread with 1/3 cup warm water on a low speed until creamy, about 1 minute. Beat in the eggs one at a time. Stir in the vanilla.
- On low speed, gradually add in the cocoa mixture until well incorporated.
- Fold in the crushed hazelnuts and chocolate chunks.
- Scoop 1 oz or 2 tablespoons of dough per cookie, placing them 3″ apart on the prepared baking pans. (Optional: Sprinkled with flaky salt.)
- Bake for 12-14 minutes, rotating the baking sheets halfway through (the edges should be dry). Allow the cookies to cool in the pan for at least 10 minutes before transferring to a wire rack to cool completely.